Populating Invoice Header fields
Background
Once you have raised
an invoice, the system automatically creates an invoice and navigates
you to the invoice detail form,
where you need to populate the invoice before you can progress it further.
Populating the invoice is essentially a two stage process:-
- Completing the Invoice Header
fields
- Adding all required charges onto the Invoice
Lines tab.
This topic is concerned with the former
of these two stages. See Populating
Invoice Content for instructions on the latter.
The Invoice Header fields are
shown in the below screen-shot within the brace:-
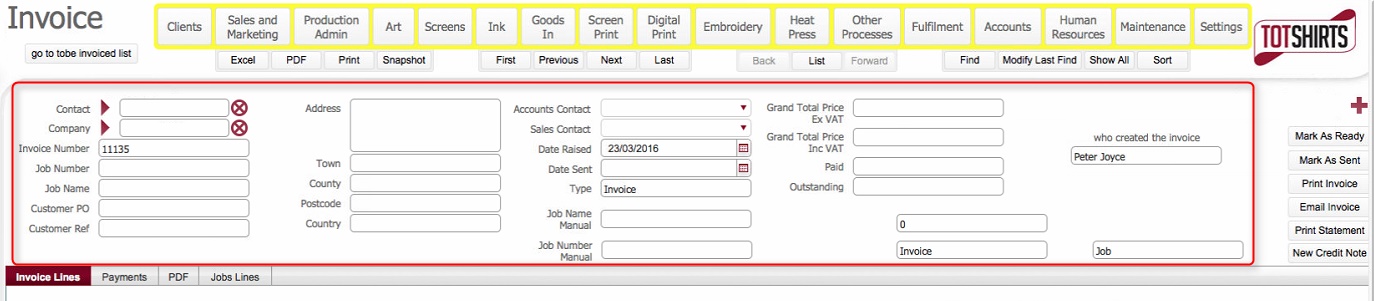
Invoice Header fields record
basic but vital information about the order, such as:-
Whom
the invoice is for.
What <Your_Organisation>'s internal reference
numbers are for the invoice
and the job order(s) to which
it refers
What are descriptions
of the job(s) to which the
invoice refers to.
What is the customer's
internal reference for their order which this invoice is in
respect of.
Where
should the invoice be mailed
to.
Who
are the internal accounts
and production contacts within
<Your_Organisation> responsible
for the customer order.
When
the invoice was raised and
sent.
How
much is the invoice total that must be paid.
It is essential that this information is
recorded fully and accurately to ensure that the invoice can be processed
efficiently and without errors
It is worth noting that some of these header fields are automatically populated
with data harvested from the underlying job orders when the invoice is
initially raised..
About this Task
This topic outlines the steps necessary to accurately populate the Invoice Header fields on a invoice
record that has been raised.
Prerequisites
Ensure that you have raised
an invoice before proceeding. When you raise an invoice, you will
be automatically navigated to the invoice detail form.
This topic assumes that you are at that point.
Procedure
- The Contact
field, records the name of the person at the client company to
whom the invoice is directed. If the invoice was raised from a job
order or fulfilment, then this should be automatically be populated
with the contact harvested from that record. If it is not populated,
or you wish to change it, click in the Contact
field you activate the contact picker
dialog.
Use this functionality to locate
and select the client contact.
Note:
When created,
a Contact must be associated to a single
Company within strokeone.
Therefore, when you select a contact,the Company
field will automatically default with the corresponding company which
the contact is associated to.
- The Company
field records the organisation to whom the invoice is due. Like the
contact field, It should have automatically populated with the Company
name from the job order or fulfilment record that the invoice was
raised from . Alternatively, if you selected a client contact in step
1) it will be populated with the company that the client contact is
associated to.
Note
a) It is possible to populate the Company
field before populating
the Contact field.
If you click within Company field you will be taken into a
filterable look ahead search dialog. to find and select the Company.
b) However, as a Company can have one or more contacts, the corresponding
Contact field does not automatically populate. Therefore
if you populate Company first, you must return to the Contact field
to select the corresponding client contact.
Given this, it is recommended wherever
possible to populate the contact first.
- The invoice number is automatically set when the invoice is raised,
and is the next unique sequence number from the internal counter.
It cannot be altered.
- The Job Number field will
be automatically populated with the job order number that the invoice
was raised from.
TBC: This allows you to select any
job (including a differing customer - what is the reason for this
?
Note: the contents of the Job Number field cannot be manually
overwritten - if you need to overwrite the contents of this field
use the Job Number Manual
field
- The Job Name field automatically
populates with a concatenation of the category
and description fields
from the corrresponding job order set in the Job
Number field.
Note: like Job
Number, the contents of the Job
Name field cannot be manually overwritten - if you need to
overwrite the contents of this field use the Job
Name Manual field.
- The Customer PO field can
be populated with the purchase order number from the customer which
originated the job order.
- the Customer Reference
field is a free form text field used to record the customer's internal
reference for their order.
This reference will almost certainly be used by the client, both in
recognising the order and in communicating any information or assets
related to the order to Strokeone Software Limited,
so it is an important field to record.
If the invoice has been raised from a job order, the value here will
have been automatically harvested from the value from the customer
reference field on the corresponding job order. You can manually enter
the reference number here if the field is blank.
- The Address, Town,
Country, Post
Code and Country fields
define the Billing Address
as to where the Invoice should be physically sent. They are automatically
populated from the billing address
field values held on the record for the Company
populated in step 2)
Tip: You can manually overwrite these if necessary
- In the Accounts Contact
field, you can use the select from the drop-down
pick list the member of staff in the accounts department who is
responsible for, and can be contact with any questions in regard of,
the invoice.
TBC: Enhancement: this should be a derived field based on accounts
contact attribute on a company record ***
- Similarly, the Sales Contact
field is used to record the salesperson responsible for the customer
job order which the invoice relates to.
TBC: This should default from the
job order / company record - it doesn't **
- The Date Raised field is
automatically date stamped with the calendar date when the invoice
was raised. It cannot be altered by users.
- The Date Sent field is automatically date stamped, when the Invoice is marked as sent.
This date is used to determine aged balances.
- The Type field automatically
populates with Invoice
TBC: is
this needed ?? *
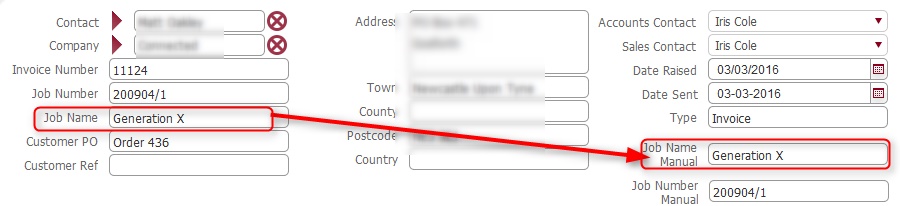
- By default, the Job
Name Manual field is populated with the value in the
Job Name field. However, unlike Job Name, you can edit the contents
of this field, and alter it if required. For example, you may wish
to change the contents from the defaulted concatentation of
the <Job Name> & <job category> values to one which
is more helpful or meaningful to the client receiving the invoice.
Note: Any value that you enter
in this field will backfill to the Job Name field. - click
for an example
- The Job Number Manual field
functions in an identical
way to Job Name Manual, with
the exception that values entered here backfill the Job
Number field.
When an invoice refers to multiple underlying jobs or fulfilments,
it can be useful here to populate this field with a more explanatory
reference.
I
The rest of the fields in the header section
are not user populated, but for reference are outlined below:-
Field |
Comments |
Grand Total Price Ex VAT |
A calculated field which shows the grand total of the charges
on the invoice before VAT.
It is calculated from an @sum of the Total
price figures for each of the charges which have been added to
the Invoice Lines. |
Grand Total Price Inc VAT |
Identical to Grand
Total Price Ex VAT above, but with VAT amounts included.
Note: VAT rates are defined
in system
settings. |
Paid |
This is a system calculated figure which represents the total
value of payments
received from the client against this invoice. |
Outstanding |
An auto-calculated field which represents the monetary value
of invoice which remains unpaid.
Calculated as (Grand
Total Price Inc VAT minus Paid)
Note: When Outstanding
is zero, the invoice is deemed "completed", and
Invoice
status updates to Green
(Completed) |
Who Created the invoice |
This field is automatically stamped with the user name of the
user whom raised
the invoice. |
Next Steps
Once the Invoice header fields have been successfully populated, the
next steps of processing the invoice is to populate
its content with charges
Related Topics
Populating Invoice Content