Populating Invoice Content
Background
Once an invoice's header fields have been filled in, the next stage of processing is to populate the invoice's content.
Content in this context refers to all the chargeable elements recorded on the underlying job order (or fulfilment) that the invoice was raised from.
Overview
Mechanistically, when an invoice gets raised, all of the chargeable elements for the underlying job it is raised from, are contained in the Job Lines tab, and the process for populating the invoice content, is to assess these elements, then select and add them onto the Invoice Lines tab so that they are included when the invoice is finalised and generated.
Example:-
By employing this "select and add chargeable elements" approach, strokeone provides you the flexibility to generate an invoice for a sub-set of chargeable elements for an order. This can be useful for scenarios where, for example, you wish to invoice a client for the production elements of a job order before any fulfilments are undertaken.
Any chargeable elements of an order that are not included on an invoice are independently tracked (essentially each chargeable element has its own included on an invoice status - see the Invoiced status in above screen-shot), and thus can be individually accounted for, identified and manually added for inclusion on subsequent invoices as required.
About this Task
This topic outlines the steps necessary to accurately populate the content of an Invoice with the chargeable elements of the underlying job order.
Prerequisites
-
Ensure that you have raised an invoice and populated the header fields before proceeding.
-
Ensure that you understand the chargeable elements that an invoice is typically comprised of. You should familiarise yourself with Invoicing Components section of Understanding Invoicing at TOT topic if you have not done so already.
For the purposes of explanation, in this topic we will use a fictitious job order:-
-
Supply and Decorate 500 T-Shirts (denominations: 200M, 100L, 100XL, 100XXL)
-
Fronts will be decorated with a 5 colour screen print image
-
Backs will be decorated with a 2 colour screen print image
-
Client will supply art work that will need colour separation to suit.
-
Despatch the decorated goods to an address in North London by Courier
Referring back to the broad categories of chargeable elements,this job entails the following types of costs:-
-
Origination: (5 screens for the front image two for the back image) and Artwork costs - time to separate the supplied image
-
Processing Costs - printing 5 colours on the front and 2 on the back
-
Product costs - supplying the 500 T shirts to be decorated.
-
Fulfilment - costs involved in picking, packing and despatching the produced goods to the required address by courier.
Procedure
-
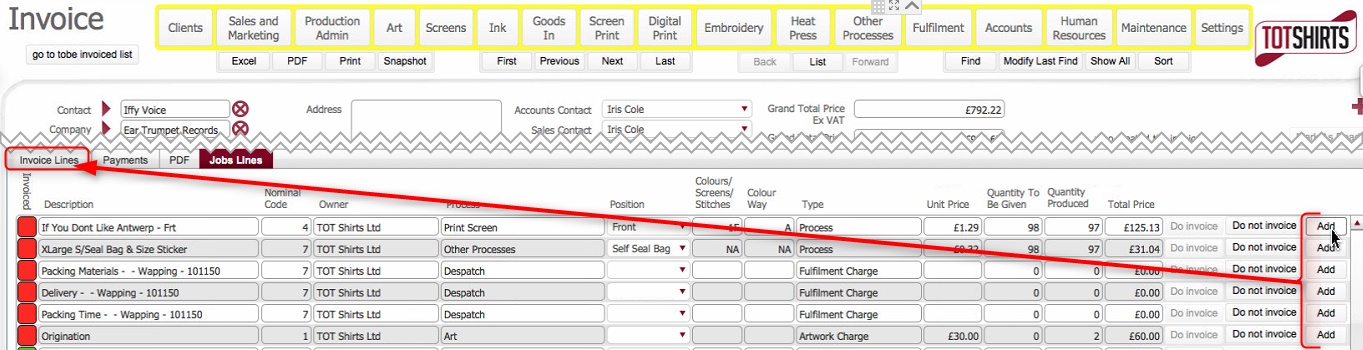
Ensure that you select the Job Lines tab.
-
The Job Lines tab lists each of the chargeable elements that have been recorded on the underlying order, together with the quantities of each item and price.
(Note: In the below sections/text,
the numbers in (bold parenthesis)
refer to the annotations in the above screen-shot)
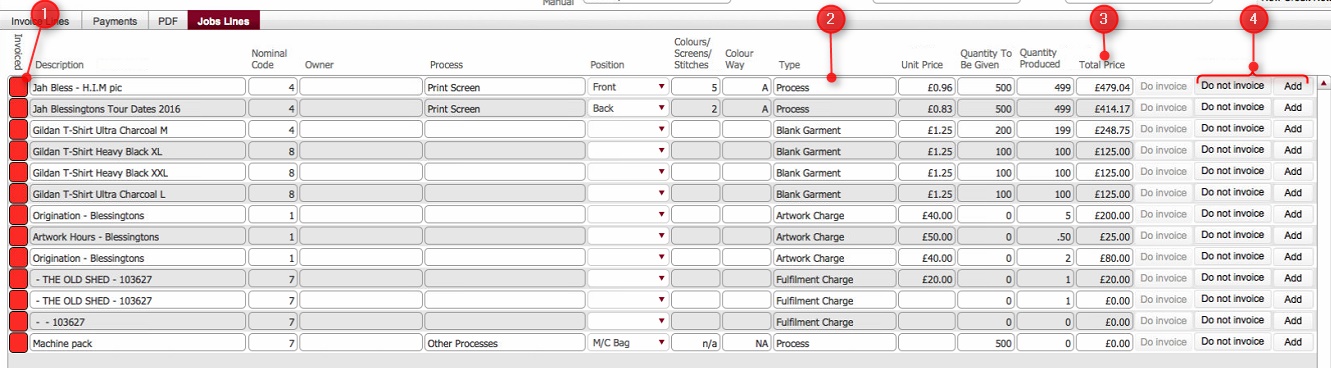
Take a moment to look note the following salient details:-
Invoice Status (1): This denotes whether the chargeable element has been dealt with, i.e. whether it has been added for inclusion, or deliberately marked as Do Not Invoice. By default all chargeable items are in a Red status denoting that they have been added for inclusion on the invoice nor marked as not to be added.
Type (2): This field denotes the broad charge category that the chargeable element falls under.
Total Price (3) This represents the (pre VAT) cost for the chargeable element - it is calculated as (Quantity Produced * Unit Price)
Action buttons (4) These buttons are how the chargeable elements are processed - Add to add the line to the Invoice Lines tab for inclusion in the invoice that will be generated,. and Do Not Invoice, to deliberately omit the element and mark it as excluded.
-
Bearing this in mind, to add a chargeable element to include on the Invoice and click the Add button to its right.

Note the following that occurs within the Job Lines tab:-
-
The Invoiced status light for the added chargeable item updates to Green
-
The Add and Do Not Invoice buttons for the item disable.

-
Simultaneously, the item is inserted into the Invoice Lines tab

-
Continue adding all the chargeable items that you require on the invoice per step 3)
-
By contrast, should you wish to deliberately exclude a chargeable element from the invoice, click the Do Not Invoice button.
 Note the following that occurs within the Job Lines tab:-
-
The Invoiced status light for the added item updates to Green
-
The Add and Do Not Invoice buttons for the item disable, and the Do Invoice button enables
(this is to allow you to reverse this step, and actually add the item if it was excluded in error)

-
Note: that the item is not added to the Invoice Lines tab.
-
Continue actioning the chargeable elements on the job lines tab, until you have added / omitted them.
TBC: placeholder for leaving some element for orphan fulfilments **
Next it is time to review the Invoice Lines Tab
-
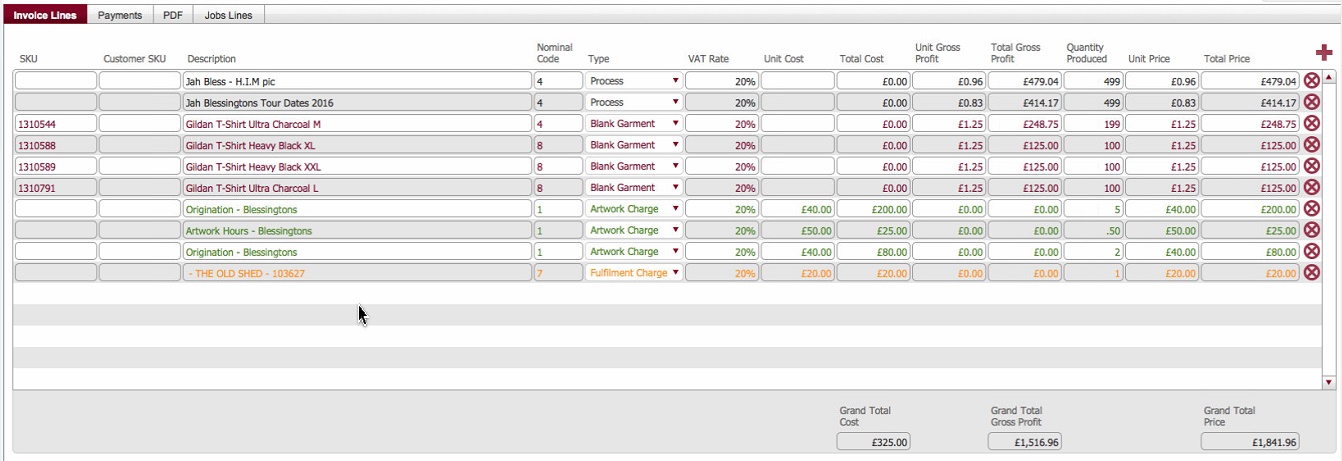
Click the select the Invoice Lines tab.
-
Review the data that is on this tab. This forms the substantive content of what will be invoiced to the customer, so it is worth double checking the contents for accuracy and completeness..
Be mindful of the following fields:-
|
Field
|
Comments
|
|
Description
|
This is the textual field describing the chargeable element, and will be included on the invoice that gets sent to the customer. If necessary, you can overwrite this with something more explanatory for the client.
|
|
Nominal Code
|
This reference number can be used as a cross reference for sales data to your accounts package. It can be overwritten if necessary.
Nominal codes are defined in system settings.
|
|
Type
|
This represents the category of the chargeable element - you can select an alternate value from the drop-down if needed.
|
|
VAT rate
|
The VAT rate is defined in system settings. This can be overridden if you require.
|
|
Quantity Produced
|
This information is sourced from various places:-
For the types of Process and Garments /Products, it represents the amount successfully produced - that is, it is taken from the final numbers recorded as produced in the Data Entry module
Note how this quantity is 499 on our example job, as 1 garment failed QC during production and was scrapped.
For Artwork charges, it is taken from the charges recorded on the Artwork record.
For Fulfilment charges, it is taken from the Fulfilment charges tab of the fulfilment records associated to the order.
Note: You can override Quantity Produced if required.
|
|
Unit Price
|
This is the cost (to the customer) per unit of the chargeable item. It is sourced from various places.
For the data rows with a type of Process it is taken from the cost that was entered for the process line
For Garments /Products, it is taken from the garment cost recorded on the garment sheet.
For Artwork charges - it is taken from the costs recorded on the ArtWork record(s) associated to the order.
For Fulfilments, it is taken from the fulfilment charges tab for the fulfilment records associated to the order.
|
Manually adding charges to the invoice
-
If you wish to manually add onto the invoice a chargeable element that was not captured on the underlying job order (i.e. it does not appear on the job lines tab) click the add record icon to the right hand side of the portal.
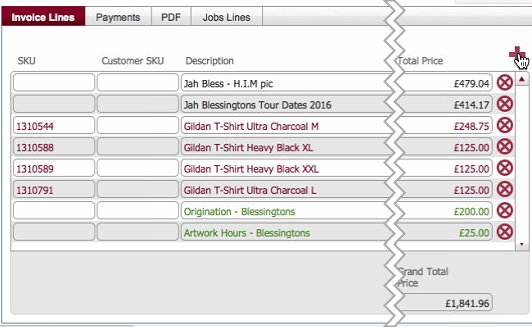
See Manually creating a charge on an Invoice for detailed instructions on how to do this.
Next Steps
Once you have fully populated and reviewed the invoice content, it is time to mark it as ready (essentially locking down and finalising the invoice)
Related Topics
Marking an Invoice as Ready