How to Add Process Lines to a Job
About this Task
This topic outlines the steps necessary to accurately record the process lines required on a job
order.
Background
Once a Job Order has been raised and the job
header fields have been populated, the next stage of writing up a
customer job order is to record the process
lines that are required for the job from inception to completion.
(Note:
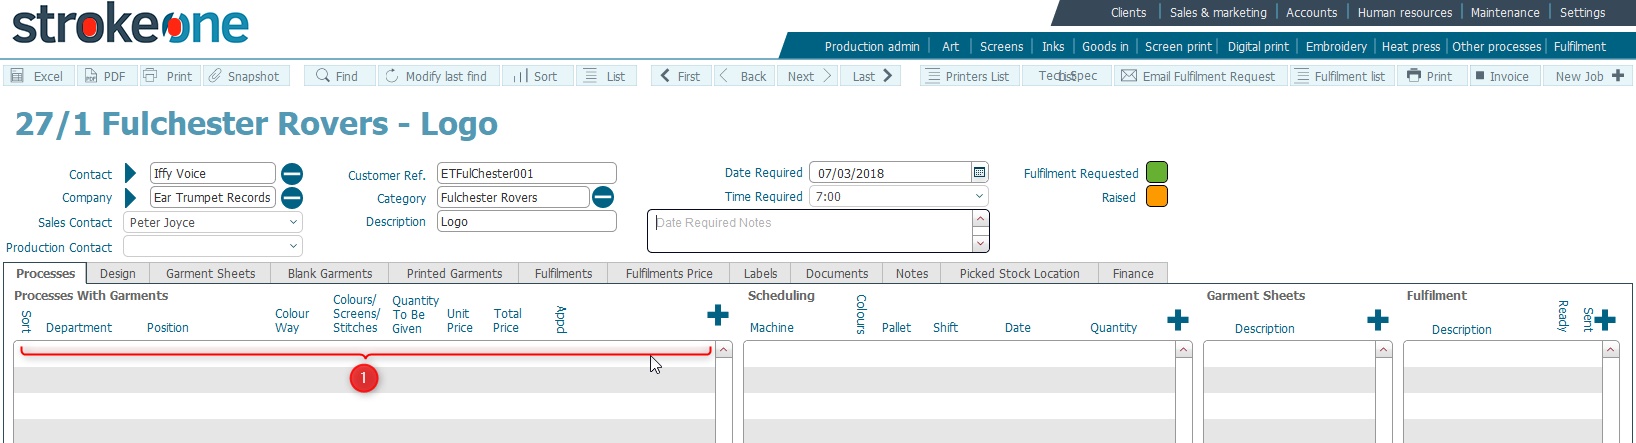
In the below sections, the numbers in parenthesis refer to the annotations
in the above screen-shot)
The process pane (1)
allows one or more process lines for the job to be recorded.
What is a Process Line ?
A Process Line record details the
department that is responsible
and the categories of activities
within that department that are required for the job order to be completed,
as well as high level information such as the position
of any image on a garment, or how many
colours the image is made up from, how
many of an item are required,
and what the pricing for the items
is.
As of the time of this user guide, the following process departments exist
:-
- Art -
this process line is treated somewhat different to others, in that
it doesn't require resource allocation records - see adding
an artwork only process line for more information.
- Embroidery
- Heat Transfer
- Other Processes
- Print Digital
- Print Screen
It is important to understand the following three pieces of information
at this point when writing up a job :-
- A job order will be composed
of one
or more process lines - For example,
if a garment is to be printed with an image front and back, then the
process lines would include Print Screen for Front and Print Screen
for back at a minimum.
- The process line is a high level recording of the activities
that are required. By itself it does
not yet contain all the details pertinent for the job to be
undertaken to completion.
- A technical specification placeholder
record must
be associated to each
process line.
The Technical specification record associated to the process line contains
the detailed granular / technical information as to how
to undertake the process, and thus varies according to the
type of process.
This level of granular information might not be known in full when
the job is being written up, (in which case it will be populated
later in the job order process), but what is important in the job
writing process is that for each
process line added, a corresponding
technical specification record
is required
to be associated to it.
Prerequisites
Ensure that you are in the Job
Details form for the job order that you need to add process line information
on, and that the Job Header
Fields have been populated.
Procedure
- In the job detail form,
click on the new
record icon just above the process
pane.

- This inserts a new
(blank) process line record

(Note: this also creates
a resource allocation record for the process line)
- Populate
the process line record as
follows :-
- The Sort field allows
you to record a numeric value against the process line. This can
be used to help sort the grids contents if you have a large number
of process lines on the job order. Populating this field is optional.
- In Department, from
the drop down list, select the department that will undertake
the process.
The following departments (see note) are available for selection
:-
Art
Embroidery
Heat Transfer
Other Processes
Print Digital
Print Screen
Note: the department values
that are displayed here as selectable are driven
from system preferences.
- In the
Position field, select
from the drop down, the value that relates to the position of
where the department
process should occur.
The values that are shown in the drop down depend upon which department was selected in step
3)b)
.
For example, if Print Screen
department was selected, the following example fields (see note
below) are available for selection :-
Back
Front
Left Breast
Right Breast
Left Sleeve
Right Sleeve
If Other Processes was
selected, then the following are available for selection:-
Cut out and insert
Machine Bag
Note: the process position
values that are displayed here are maintained
in system preferences.
- The Colour
Way field usually (but not exclusively) refers to job orders
which require the Print Screen
department.
In general terms colour way refers to how
many times a print
run will have to be stopped
to facilitate a
change
in the printed image.
If the printing of the image for the selected position does not
require any changes (i.e. it is a single colour), Colour Way can
be recorded as A
(Tip:
Although typically populated with a single letter, this field
can be edited to hold extra information to aid clarity)
There are two
common scenarios when
changes are required for an image to be printed.
When
the same single colour image will be printed on an order but in
two (or more) different colours (Same screens used)
When a common image will be printed throughout
the order, but with additional (differing) text on some of the order (Individual
screen to be changed)
Tip: The Colour Way field can also be used to record reference to
a spreadsheet or other document when writing up a job with a large
number of identical process lines which differ only slightly.
For example, consider a job where there are 25 garments to be printed,
and each has a common front, but the backs differ for each of the 25 shirts.
Rather than write up 25 process lines records for the back, each with a
separate Colour Way reference, it would be more expedient to record see attached doc in the Colour Way
field. (see How
to select an item from a drop down list for how to add an entry to
the colourway drop down list) and add
the external document to the job orders documents
container field.
Notes:
a) There are many variations that can occur here in terms of Colour Ways
and decorations, which cannot be exhaustively listed here, but require
knowledge gained by experience.
If in doubt as to how to populate any elements on this layout refer to
senior staff.
b) Certain processes (for example, packing) do not require Colour Way information
to be recorded. For these scenarios, you can record the value as n/a
- The Colours / Screens/ Stitches
field allows you to record a numeric value of how
many colours (or stitches
or screens)
are associated with the process line Department
and Position.
For example, if the job order being raised refers to screen printing a 10
colour image on the front
of a garment, then the value recorded here would be 10.

Note
on flash curing:for the Screen
Printing process, sometimes a job order will be require
the image to be printed onto a dark coloured garment. When this
occurs, a base colour is often needed to "block
out" the colour of the garment and form the foundation
upon which the print is applied. Typically white
is applied as this base, and during the printing process
the white base must be dried
before other colours can be applied. This drying process
is known as flash curing,
and typically will require an additional physical screen through
which the base white ink is applied.
This extra flash curing
requirement is recorded in strokeone
by suffixing the number of colours with a "F". For example,
for a 10 colour print which required a base white ink to be first
applied and flash cured, the number would be written as 10F.
Suffixing a number with F will also cause the number of individual
screen data records created for the screen-set in the associated
technical specification record to be incremented by one. In the
above example, the screen-set record would be created with eleven
data records for the underlying screen-set members
Similarly, if the job referred to embroidering
an image made up of 1,000 stitches
on the right breast
of a garment, the value recorded would be 1K (as typically embroidery
stitching is counted in units of one thousand)

Note: This
colour / screen/ stitch information may not yet be known when
the order is first placed, as it ultimately is driven from the
artwork associated with the order. This may not yet be received
or available when the order is first placed. Should this be the
case, you can leave it blank here, and it can be populated during
the technical specification write up.
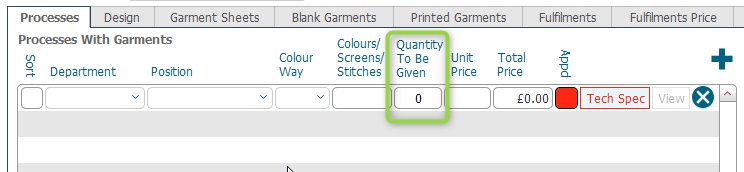
In
the To Be Given field
record the total
number required for the order for this process line.
That is, the quantity required according to the Department / Position / Colour
Way combination.
Note:
As this figure is recorded at the Department
/ Position / Colour Way level
of uniqueness, it does
not necessarily refer to the total size of the order, nor the
garment size breakdown of the order.
Tip: This field should
always be populated with the required number for the process line.
As it is a required field, when the process line is initially
inserted, it is defaulted with a zero value.
- In Unit Price enter
the price for one unit of the process.
- The Total
Price field
is automatically calculated as @sum
(Unit Price * Quantity To Be Given).
- The Approved
field is initially set as Red
(Not Approved). This can be toggled to green
(approved) when you are content that the process line is
ready to occur.
See Setting
the Process Line Approved Status for example usage.
Note: The process line
approval icon is exposed in the corresponding process
line layout - e.g. for a print screen process it is exposed
in the print
process layout.
- Repeat steps 2) to 4) should the job order require more than one
process line.
Results
Once the process lines for a job order have been recorded, the next
step in writing up the job order is to populate
scheduling information for the process, create
/ associate
a technical spec to the process line, and record the details
of the garments associated with the job order.
Related
Topics
Writing
Up a Job Order
Understanding the
Job Order Detail Form
How to Populate Job Header
Fields
How
to Add Scheduling Information for a Process Line
Associating
a Technical Spec to a Process Line
How to
Populate Garment Sheets Required on a Job