To Be Picked Layout
Background
Once blank garments have been allocated
to a job order, the next stage of the production process is to physically
collect the allocated blank garments from their current location(s), and
relocate these to a process area where they will remain until they are
used.
This process is known as picking.
The To Be Picked layout lists
those job orders that are "eligible
to be picked"
In order to be eligible for picking all
the following conditions must be met:-
Field |
Comments |
Eligible Statuses |
| Allocated |
Stock must be either fully or partially allocated.
That is, allocation is a prerequisite for picking |
Green (All items have been fully allocated)
or
Amber (One or more items are not fully allocated) |
| Available to Pick |
Stock must be at least partially available to pick |
Green (All items are available to pick);
or
Amber (One or more items on the job order are
not fully available to pick) |
| Picked |
If all stock on a job order is picked, then there is no requirement
to pick |
Amber (Not all stock picked)
or
Red (No items have been picked) |
| Note: All
the above statuses are aggregates - that is they are at job order
level. Be mindful, that a job order may have several lines of
items, each of which has it own status. |
About this task
This topic will instruct you how to open, interrogate, understand the
contents of, and the actions allowable from, the To
Be Picked layout.
Prerequisites
Ensure that you have logged
onto strokeone,
and that you can see and access the Goods
In button in strokeone
home
banner.
Procedure
- From the home
banner, click the Goods In
and then the To Be Picked
button.
The layout will populate with job orders which meet the eligible to pick criteria as outlined
above, grouped by Date
Scheduled value, and then sorted
by ascending Priority
value.
(Note:
for this topic certain field values have been deliberately obscured in
the screen-shots)
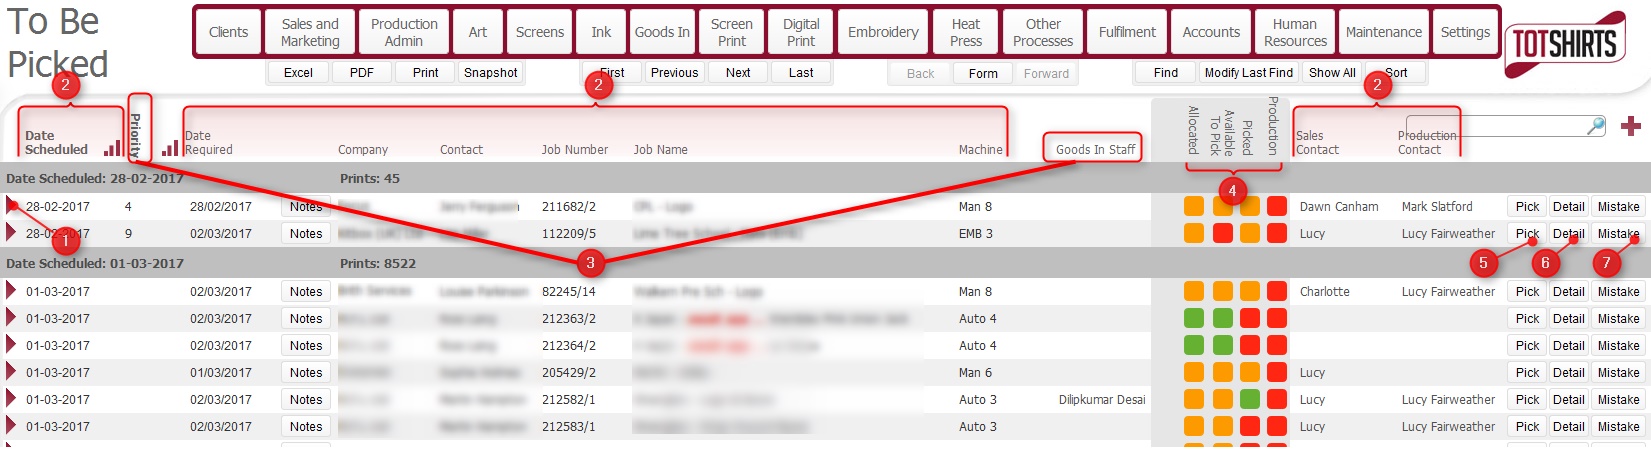
(Note: In the below sections/text,
the numbers in (bold parenthesis)
refer to the annotations in the above screen-shot)
Layout Composition & Actions Permissible
This layout is composed of the following elements:-
(1) Open record icon -
will open up the detailed
record for the job order.
(2) Job Order data fields. Specifically,
for each job order listed, the following information is shown:-
Field |
Comments |
| Date Scheduled |
The earliest scheduled process date of any process line on
the job which requires the garment |
| Date Required |
The date required of the Job Order |
| Company |
The company whom placed the job order. |
| Job Name |
The name of the job order. (a concatenation of the category
and description field from the job
order header fields) |
| Job order Number |
The internal reference
number for the job order. |
| Machine |
The machine that is scheduled to undertake the earliest process
on the Date Scheduled. |
| Sales Contact |
The sales person recorded on the job order. |
Production Contact |
The production administration staff member responsible for
the job order. |
(3) Picking Allocation fields. These
two fields allow you to manage the workload associated with picking stock
by:-
(4) Status fields
Field |
Comments |
| Allocated |
The current allocation
status of all items required on the job order. |
| Available to Pick |
Items are fully available to pick, when the in warehouse balance
is equal to or in excess of the quantity required.
See Understanding
Available to Pick Status for Blank Garments |
| Picked |
Reflects the current picked
status of all items on the job order. |
| Production |
The Production status of the job order. |
| Note: All
the above statuses are aggregates - that is they are at job order level. Be mindful,
that a job order may have several lines of items, each of which
has it own status. - see Understanding
Available to Pick Status for Blank Garments if you require
additional explanation. |
(5) Pick Button: will
navigate you to picking layout,
allowing you to process picking stock for this job order.
(6) Detail Button:
this will display a pop-up window which provides additional details for
each item required on the job order
Click for
more details
(7) Mistakes
button. Will automatically navigate to the Job
Line Mistakes layout, and automatically create a new mistake
record.
Related
Topics
Picking Stock For a Job
How
to view Job Details
Allocating
Blank Stock via the Garment Sheet