Embroidery Layout
Background
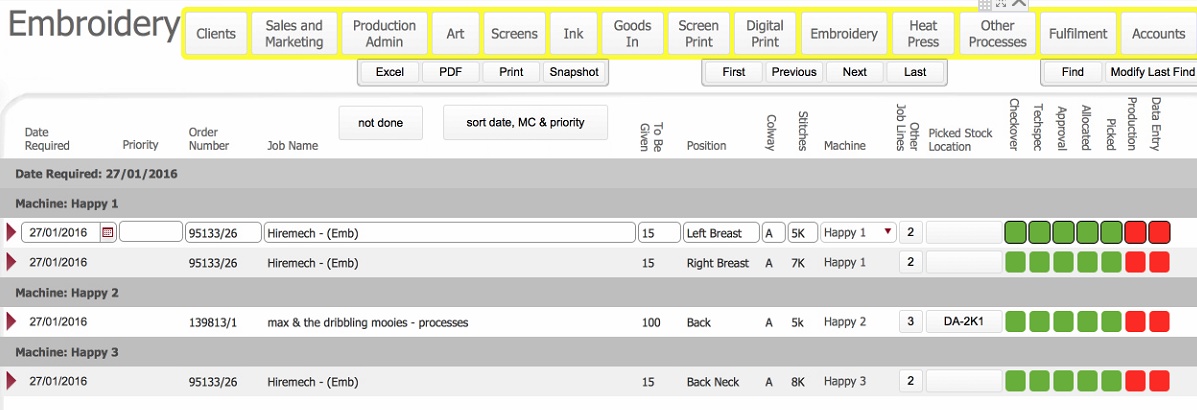
The Embroidery layout outlines those jobs which require embroidery processes, and shows the status of the antecedent/connected processes.
Additionally from within this layout users can, record that the embroidery process is started, paused or finished as well as record the quantities successfully processed, scrapped, and any mistakes
At the end of all production processes on a job order, this layout allows you to access data entry to record the final amount produced.
Note: There are numerous embroidery layouts. They are functionally identical, with the only difference being they may show a sub-set of the data based on a particular criteria - for example, show only processes for a specific machine name or for a specific date required
About this task
This topic will instruct you how to navigate to, understand the contents of, and the actions allowable from, the Embroidery layout.
Prerequisites
Ensure that:-
Procedure
- From the home banner, click Embroidery.
- Rather than see all the embroidery process line records (which could be a very large quantity), you will be presented with a further choice as to which sub-set of this total found-set of embroidery process line data to display.
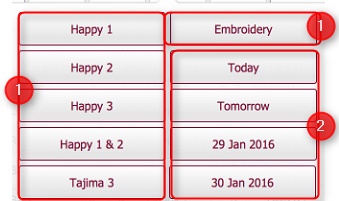
- Essentially, the found-set can be filtered down by two dimensions - the machine name that the embroidery is scheduled to be carried out on or the date on which the embroidery process is scheduled.
- If you wish to see data for a specific screen print machine, click the applicable machine name button (1)
- Conversely, to see embroidery process lines for a specific date required, click the corresponding date button (2).
By default, the date choice button are:-
- Today
- Tomorrow
- Today+2
- Today+3
- The Embroidery list layout opens, filtered according to the criteria selected in step 3)

(Note: In the below sections/text,
the numbers in (bold parenthesis)
refer to the annotations in the above screen-shot)
Note: Records are displayed according to how the resource allocation records were created for the process line.
That is, if several resource allocation records were created for single process line, then several process line records will be shown in this layout.
Layout Composition & Actions Permissible
The layout is composed of the following elements
(1) Click on the open record icon to drill down to the Job order Detail form.
(2) Data Fields for the Process Lines that require Digital Printing.
|
Field
|
Comments
|
|
Date Required
|
The date by which this embroidery process needs to be completed This date is taken from the scheduling date that was initially recorded for this process line when the job order was written up.
Note: You can click on this calendar icon besides this field to amend the date as required.
|
|
Priority
|
This is a text field to allow production managers to apply a numeric priority to the processes. The layout contents can then be sorted by date required, machine and priority (14) to assist workload balancing.
|
|
Order number
|
The internal reference number for the job order which has this digital print process on it.
|
|
Job Name
|
Job name is a concatenation of the category and description fields taken from the job order. These two fields provide information as to which group the job order is for, and what the actual content of the job order is.
|
|
To Be Given
|
TBC: label name s/b Qty ?**
This is the quantity of items scheduled for embroidery on this machine. This number is taken from the quantity field of the process lines resource allocation record..
This number can be overwritten if necessary.
For example, consider a situation where the quantity to be embroidered was 10,000, and was scheduled across two days, with 7,000 on day 1 and 3,000 on day two.
It might not be logistically possible to embroider 7,000 on day one, so the quantity for day 1 could be overwritten to be 5,000; consequently, the quantity for day 2 would need to be adjusted.
TBC: Ability to add in a process line entry in this layout needed - e.g. consider the above scenario, where job would need 3 days - need ability to add a new line to record day 3 amounts. Note this could be done by adding in another schedule record on the production admin layout.*
|
|
Position
|
The physical position of where on the garment, the embroidery will be occur. This is taken from the job order process line details.
|
|
Colour Way
|
The ColourWay for the embroidery process line
|
|
Stitches
|
The quantity of stitches for this embroidery process line.
Note: Embroidery stitches are typically counted in units of 1,000, and expressed in shorthand of K for thousand. Thus 1K = one thousand stitches.
|
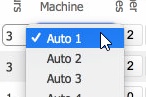
(3) Machine button -This details the machine that the embroidery is scheduled to occur on.
You can move the process to another machine, by clicking on this field, and selecting another machine from the drop-down.
(4) Other Job Lines button: This button label denotes how many process lines in addition to the current one are associated to the job order number. For example if it reads 2, it means there are three process lines in total associated to this job. This provides a quick visual reference to aid scheduling and gauge effort and resources required to complete the job.
Clicking on this button will display a pop up showing all the process lines on the job order.
Click for example
(5) Picked Stock Location: This denotes the current physical location of the blank garments which have been picked ready for the embroidery process. This location is updated when picked garments are moved to the machine and the embroidery process started.
(6) Status Icons:this section contains a series of icons that denote the current status of various processes connected to the embroidery process.
These can be summarised as follows:-
|
Icon Label
|
Comments
|
|
Checkover
|
Indicates the checkover state of the Artwork record for the image that will be embroidered.
|
|
TechSpec
|
This shows the state of the raised flag on the associated technical specification for this embroider process.
|
|
Approval
|
The approval status for the process line.
|
|
Allocated
|
The status of blank garments allocated to the whole job order.
|
|
Picked
|
Denotes the status of blank garments picked for the whole job order.
|
|
Production
|
The status of the embroidery process itself. This is updated when the embroider process is started, paused or finished.
|
|
Data Entry
|
When the last process line on a production order completes, the final quantities produced are recorded. This status light denotes the status of recording that data entry.
|
(7 to 9) Process Activity Buttons:
These three buttons record the process activity
|
Button Label
|
Comments
|
|
(7) Start
|
Marks the Embroidery process as started
|
|
(8) Pause
|
Marks the Embroidery process as paused
|
|
(9) Finish
|
Marks the Embroidery process as completed.
Note: upon completion of the last process line on a job, you need to record the final quantities produced.
|
(10) Detail button: this will display a detail pop up window with a series of related data,
(11) Data button: This is used when the final process for a job order is completed to record the quantities of product produced for the job order.
(12) Mistakes button: This is used to record mistakes on the process line.
(13) Not Done button: Clicking this will filter the foundset to show those records where production status is Not Completed.
(14) Sort by Date, Machine Name and Priority button: Clicking this button will sort and group the foundset by Date Required, machine name and ascending priority
Click for example
Related Topics
Marking an Embroidery Process as Started
Marking an Embroidery Process as Paused
Marking an Embroidery Process as Finished
Data Entry at the end of the final production process
Recording Mistakes on a Process Line