.
 (Note: In
the below sections, the numbers in parenthesis refer to the annotations
in the above screen-shot)
(Note: In
the below sections, the numbers in parenthesis refer to the annotations
in the above screen-shot)
Once a fulfilment record has been created on a job order, it needs to be populated with the details of the actual fulfilment, e.g. - what products are included in the fulfilment, where is the fulfilment being despatched to, and when it is required.
See Understanding Fulfilments for more details.
This topic outlines how to populate a fulfilment record that has been created on a job order. This is the second stage in writing up a fulfilment.
Ensure that you have opened the detail form for the job order with the fulfilment record which needs populating.
(Note: In
the below sections, the numbers in parenthesis refer to the annotations
in the above screen-shot)Layout Composition
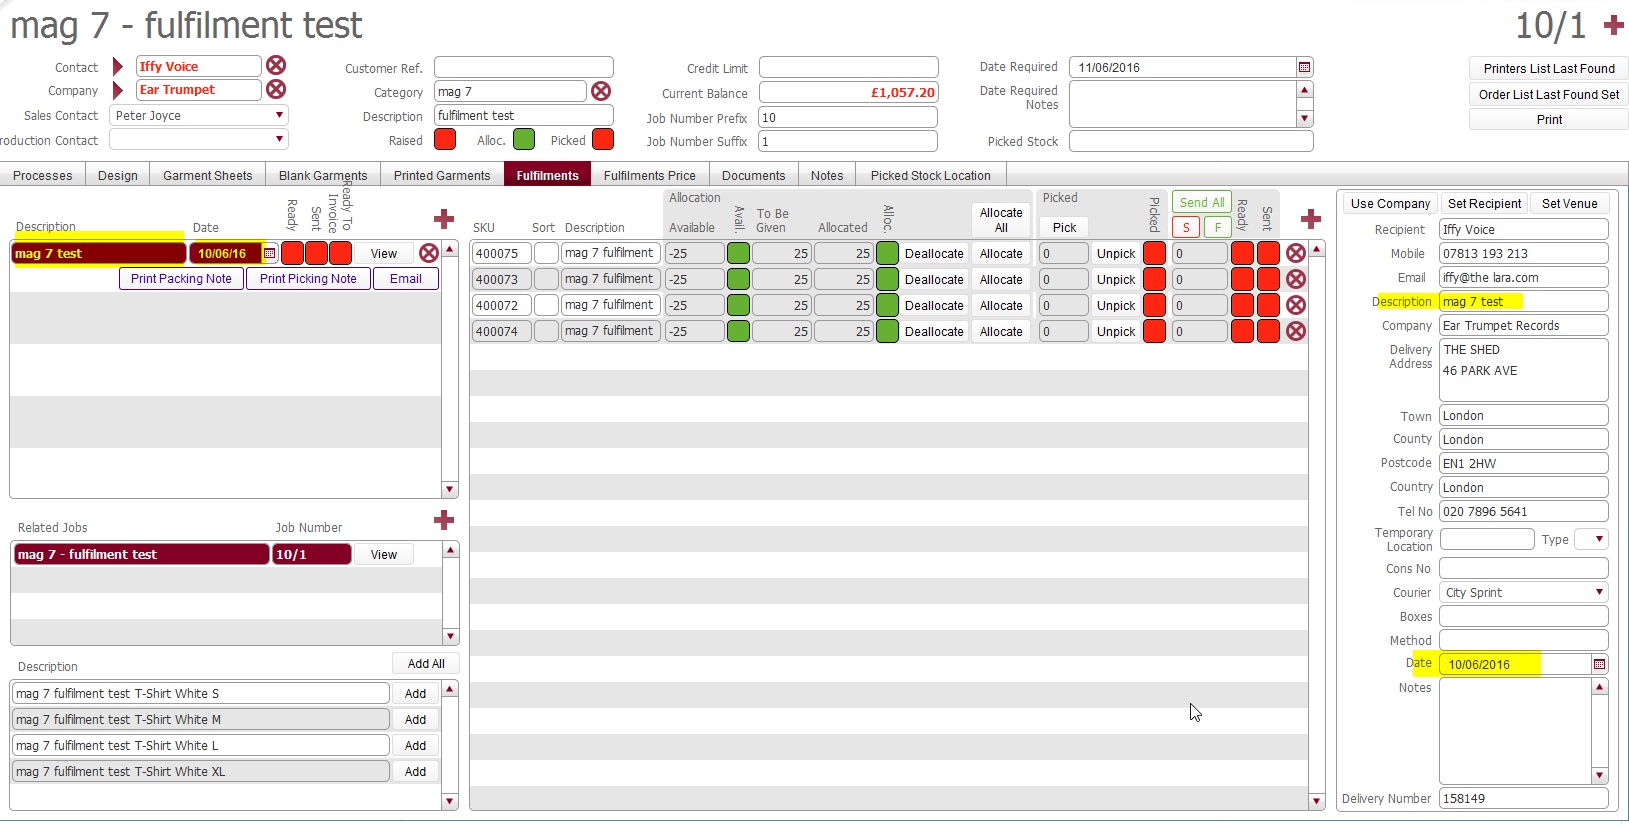
Take a moment to familiarise yourself with the layout contents.
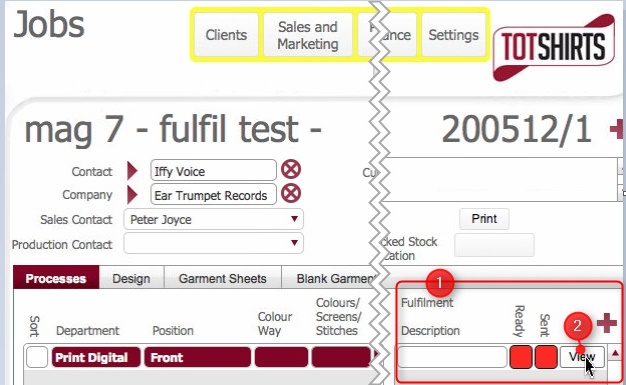
The top left pane (1) shows the
Fulfilment records on the job order.
If there are numerous fulfilment record for this job order (i.e. a one
to many) they will be listed here
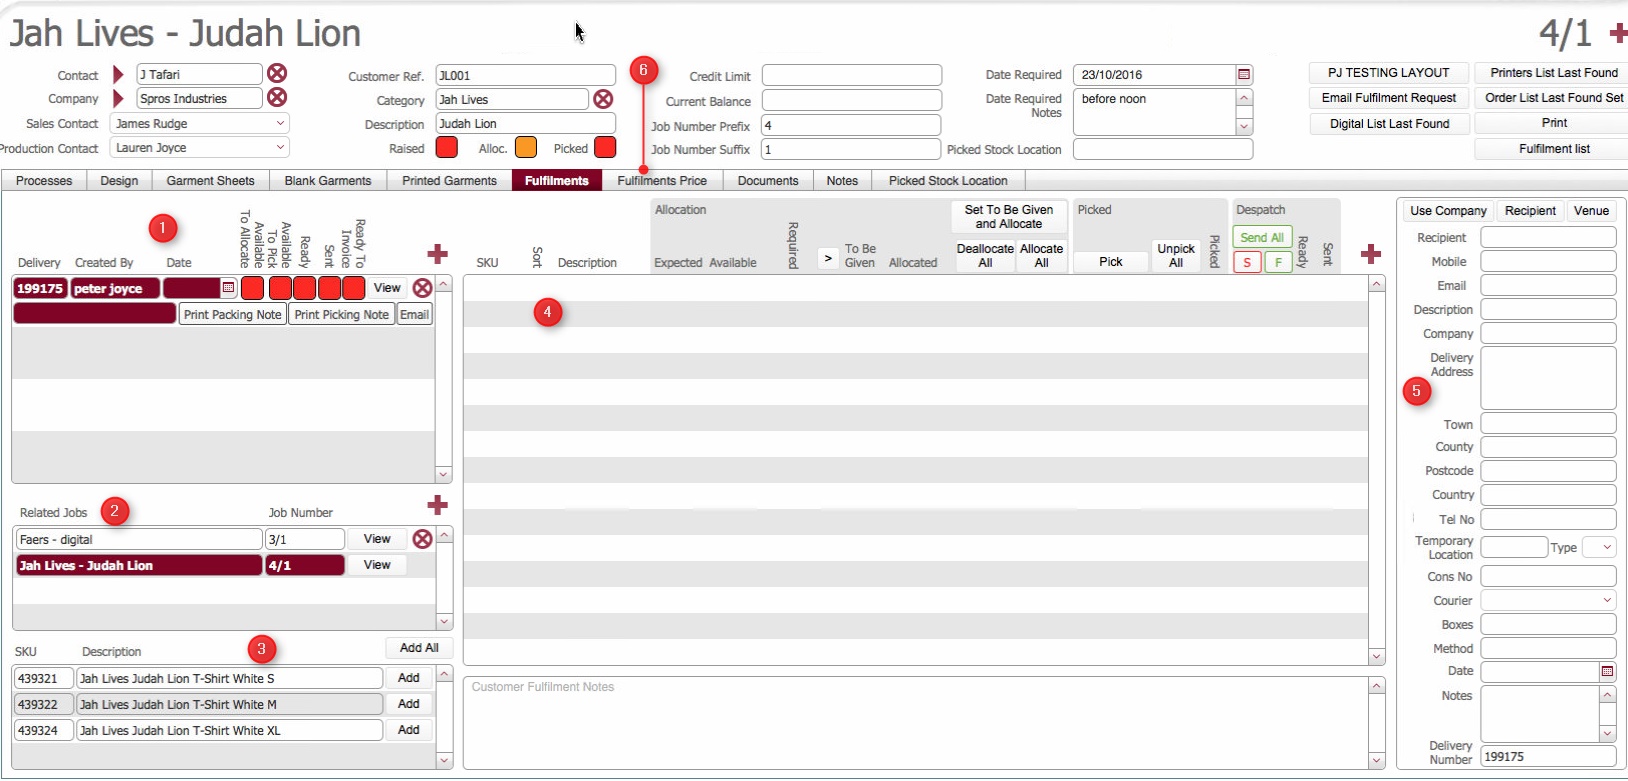
For each fulfilment record, the following components are displayed:-
Item |
Type |
Comments |
Description |
Field |
This can be thought of as a job name for the fulfilment.
It is automatically populated with the value from the description
field in the delivery address
pane (5). See step
25) below. |
Date |
Field |
This is the date that delivery is required for this fulfilment. Like Description above, it is automatically populated with the date value selected in the delivery address pane (5) See step 27) below |
Ready |
Icon |
This denotes the state of the fulfilment's assembly, and is updated as the assembly starts and ultimately finishes. Red denotes that the fulfilment assembly / boxing up has not
started. |
Sent |
Icon |
This denotes the state of the fulfilments despatch, and is updated when the fulfilment is sent. Red denotes that the fulfilment has not been sent. |
Ready to Invoice |
Icon |
This denotes that the fulfilment is ready to invoice and is set once any fulfilment costs have been recorded (or there aren't any) on the fulfilment. |
View |
button |
The View button
is used to select the fulfilment record to enable it to be viewed
/ administered. |
button |
Clicking this will generate an email to the contact from
the order containing a PDF of the delivery
note together with the costs that are recorded on the fulfilment. |
|
Print Packing Note |
button |
Click this to print out a hard
copy of the packing note.
|
Print Picking Note |
button |
Click this to print out a hard copy of the picking note.
A picking note is an internal aid which is used during the “boxing
up” of larger or complex fulfilment orders.
It is used as a reference when creating box end labels
|
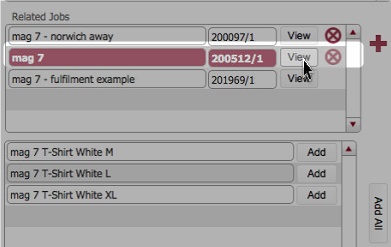
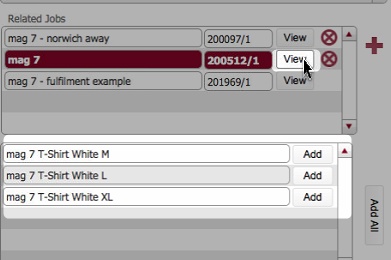
The Related
Jobs pane (2) show the
jobs associated to this delivery, and the next pane (3)
lists the products that were created (and thus available to select for
inclusion on a fulfilment) for each of the selected related jobs.
The fulfilment contents pane (4) lists the actual contents of
the fulfilment - i.e. which products are, and in what quantities, included
on the fulfilment.
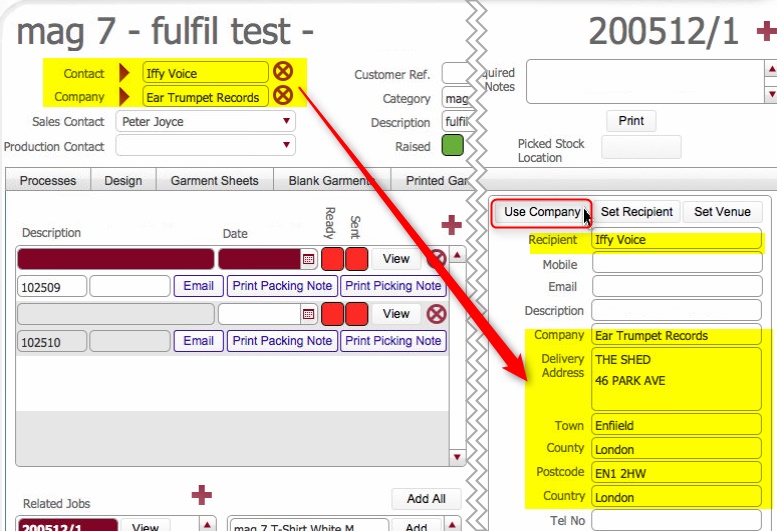
The delivery pane (5)
details where the fulfilment will be despatched to, the despatch method,
and the date by which it is required.
The Fulfilment Prices (6)
tab is used to record
the fulfilment charges, and also to mark it as ready
to invoice.
Notes:
The delivery pane (5) is not populated,
until a fulfilment has been selected for view (by clicking its view button)
in the top left pane (1).
The delivery pane (5) and fulfilment
contents pane (4) are unique per fulfilment record. That is,
they are linked to whichever fulfilment in the top left pane (1)
is being viewed.
.
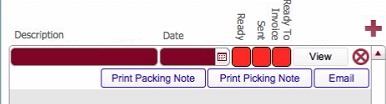
Selecting a fulfilment record to populate


Now that the items have been added, the next steps in processing the fulfilment are to set the To Be Given Quantity per SKU, and then allocate the items.
Note:
You must allocate the items once you have added them.
This is now a required step to align with the functionality in the vendor
site where the stock is automatically
allocated as soon as a delivery order is
placed.
There are several methods how you can do this - Method 1 is the recommended process to follow in most instances.
Method 1: Automatically, setting the To be Given Amount, and Simultaneously automatically Allocating
Under this method, strokeone will set the To Be Given quantity and allocate the maximum of what can be allocated.
Tip:
In terms of allocation, the system will apply the rule that the maximum
of what can be allocated "maximum
allocatable amount" on
a Decorated SKU is the sum
of the Available and Expected
quantities.
Click here to see
a table of example of the maximum allocatable amount.
Method 2: Manually setting the To be Given Amount, and then Manually Allocating the items.
As you can infer, this method requires separate steps for setting of To be Given and allocated amounts
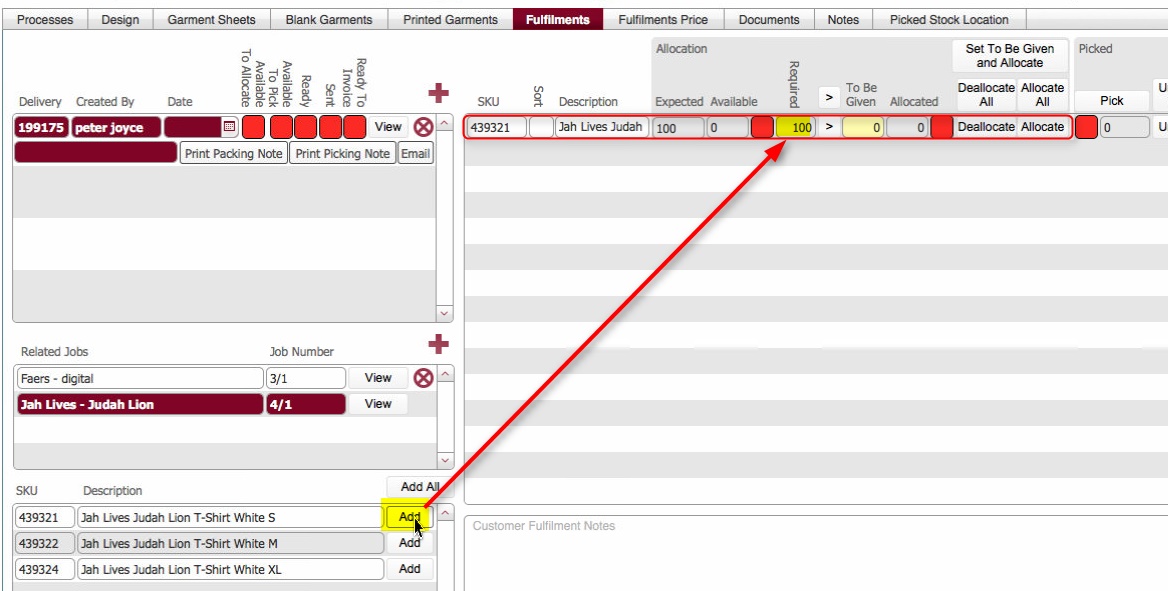
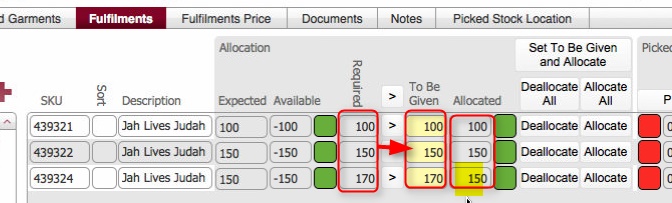
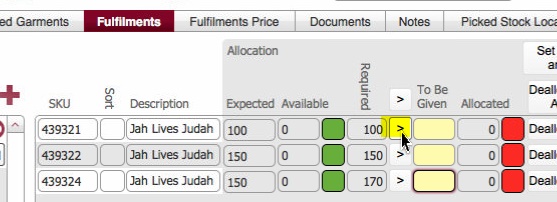
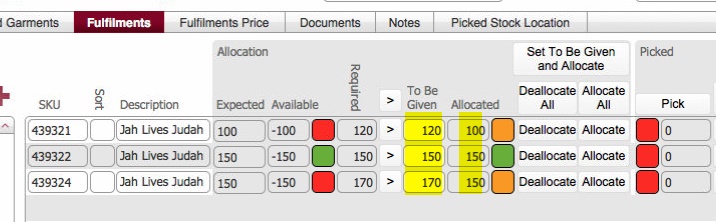
Step 1: Setting the To Be Given Amounts
Click the >
icon beside the item to automatically set the To
Be Given .field with the same value as the Required
field.
e.g.

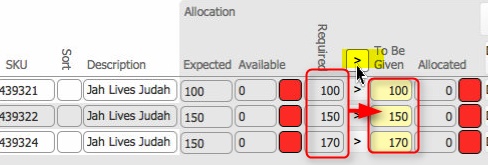
Alternatively, you can click the
top level > icon:-

which will automatically populate the To be Given values of all
of the added items with the amounts from their corresponding
Required field
Step 2: Setting the Allocated Amounts
You
must manually allocate the stock items that you have added in the
above steps.
By allocating products to a fulfilment, they are effectively "reserved"
for usage in the fulfilment, and not available for other fulfilments.
In stock balance terms, once a stock item is allocated on a fulfilment,
the available balance for the item is debited by the allocated quantity.
There are two "manual" methods by which you can allocate
the products to the fulfilment.
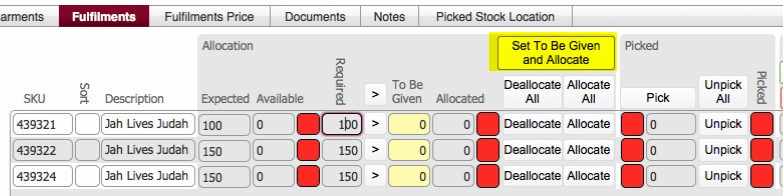
Method One: You can click the Allocate button beside a single product row, which will allocate the max_allocatable_quantity for the SKU, where:-
max_allocatable_quantity
is the lower of [sum of Available, plus Expected
] or To Be Given Amount.
To do so:-
Click the Allocate
button besides the single row

This will automatically allocate
an amount equal to the max_allocatable_quantity
i.e. in the below screenshot, the sum, of Expected and Available
is 100, and the To be Given Amount is 120. The maximum allocatable
amount, being the lower of the two values, is 100, and therefore
that is what is allocated.

Note following updates that occur:-
Allocated Quantity is credited with max_allocatable_quantity
Available Quantity is debited by max_allocatable_quantityy
The Allocated status is recalculated
Note:
Allocating items may result in a negative Available balance.
This is normal as for fulfilments you can order, and thus must allocate,
against stock items that are not yet manufactured. Specifically, you can
order a maximum of what's physically available
plus what is expected.
Once the expected items are manufactured and data entered, then the available
balance will credit with the quantity actually manufactured, and come
back into proof. (Assuming that the quantity successfully manufactured
is equal to the number expected)
See here
for more details on how strokeone
accounts for Allocated, Available and Physical
Availability for items on a fulfilment ,
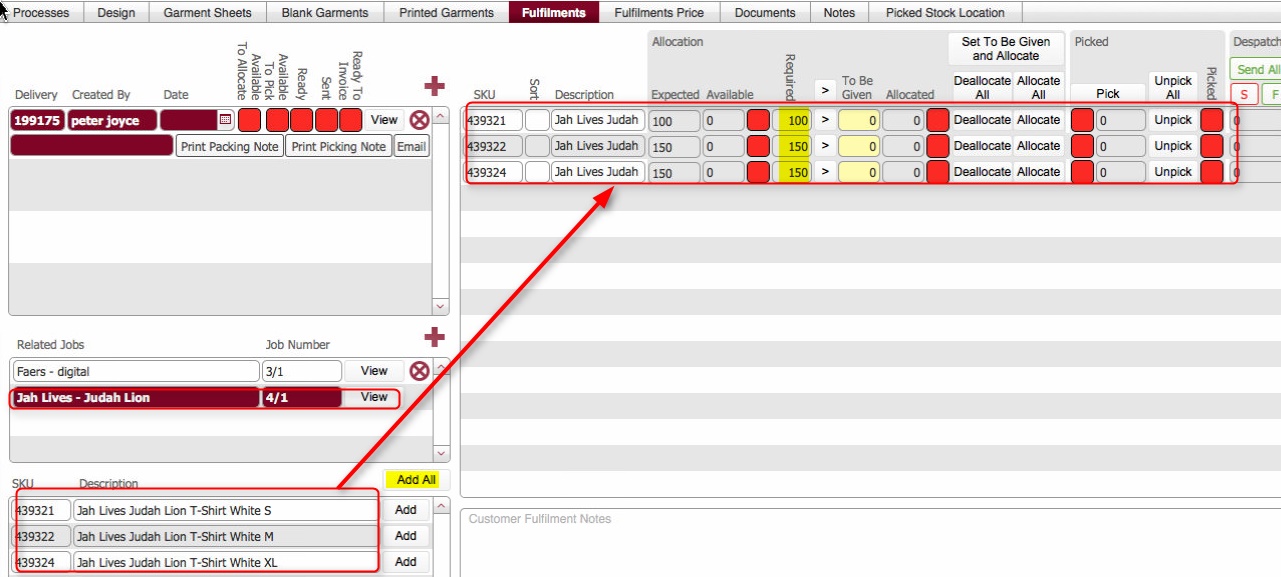
Method Two: You can use the
Allocate All header button, which
will automatically allocate the max_allocatable_quantity
for all items on the fulfilment.
This is identical to method one, but applies the allocation
process to all the items)
To do this-
Click the Allocate All
header
button..
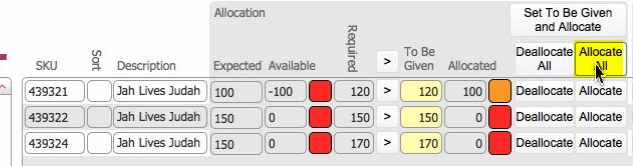
This will automatically allocate
for any item that has a zero allocated amount an amount equal
to max_allocatable_quantity
Note following processes that occur:-
strokeone identifies those items on the fulfilment that have a zero quantity allocated -"zero items"
For each zero item
Allocated Quantity is credited with an amount equal to max_allocatable_quantity
Available Quantity is debited by max_allocatable_quantity
The Allocated
status is recalculated.
Notes:
Allocating items may result
in a negative Available balance. This is normal as for fulfilments
you can order, and thus must allocate, against stock items that are
not yet manufactured. Specifically, you can order a maximum of what's
physically available
plus what is
expected.
Once the expected items are manufactured and data entered, then the
available balance will credit with the quantity actually manufactured,
and come back into proof. (Assuming that the quantity successfully
manufactured is equal to the number expected)
See here
for more details on how strokeone
accounts for Allocated,
Available and
Physical Availability
for items on a fulfilment ,


Adding Non Job Related Products onto a fulfilment.
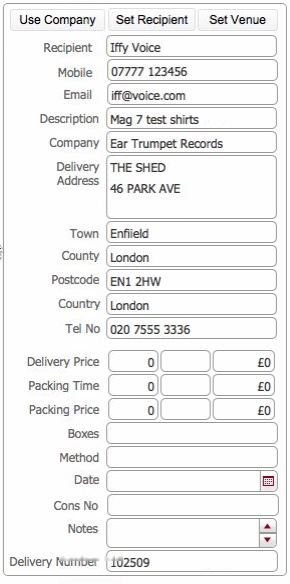
Populating Delivery Address
Details
See Understanding
Delivery Address Details for overview of how we handle Recipients
and Address Details.
Field |
Comments |
Cons Number |
Enter here any reference
number from an external courier service should that be the despatch
Method
|
Courier |
If the fulfilment
will be despatched by courier
(in which case Method should
be defined as Courier), then this field records
which courier is used. |
Boxes |
This is automatically calculated based on information recorded during the Box End Label process, and details the total number of boxes that make up the Delivery |
Method |
The Despatch Method for the fulfilment, e.g.
This field is exposed onto the Vendor Website, so it is strongly recommended that you accurately populated this with the name of the courier company that are being used, so that the client can directly contact them if needed. |
Date |
Use the calendar
icon to select the Date which the fulfilment should be despatched. |
Delivery Number |
This is automatically populated as per the fulfilment records pane (1) |
Delivery Notes |
Enter here additional delivery and/or any other pertinent instructions. |
Note: if there are multiple
fulfilment records on the job, i.e. you are populating a one
to many
or many to many
form of fulfilment, then you will have multiple fulfilment records to
populate. To do so, simply repeat steps 3) to 30) but this time click
the view button besides the next
fulfilment record in the top left pane.
Related Topics
Creating Fulfilment Record(s) on a Job Order